
You are currently browsing the category archive for the ‘Windows’ category.
There are times when one needs to “quickly” find out what time a machine was last rebooted. Now I know that there are events in the “System” log that announce starting of the event log service but logs can be truncated after last boot and going to the event log and filtering, can take some amount of time/effort. A quick way around that problem is to open a command window and type:
net statistics server
Running it, results in an output similar to this:

Output of the command “Net Statistics Server”
Event IDs change sometimes but this command has remained the same since NT days and is still valid. Of course, the command is actually there to display network statistics but it has this useful feature that displays the time when the service started. As it starts quite early during the boot process, it is as close as you can get to the last boot time and is quick to do.
Bonus: net statistics workstation – does the same! 🙂
Hope this helps!
One of my colleagues is currently researching cloud services. Like me, he is also very interested in VMware Hybrid Cloud and created an account as soon as it was made available. However, despite using supported browsers, he ran into problems trying to delete a virtual machine that he had created earlier. Every time he tried, an error was returned:
There was an error running your last operation. Press CTRL + E to refresh the page and try again or logout and log back in before trying again
He obviously tried refreshing and was unsuccessful. In case there was something wrong with his browsers, I offered my help as I had a freshly built virtual machine. This is what the problem looked like when deletion was attempted:

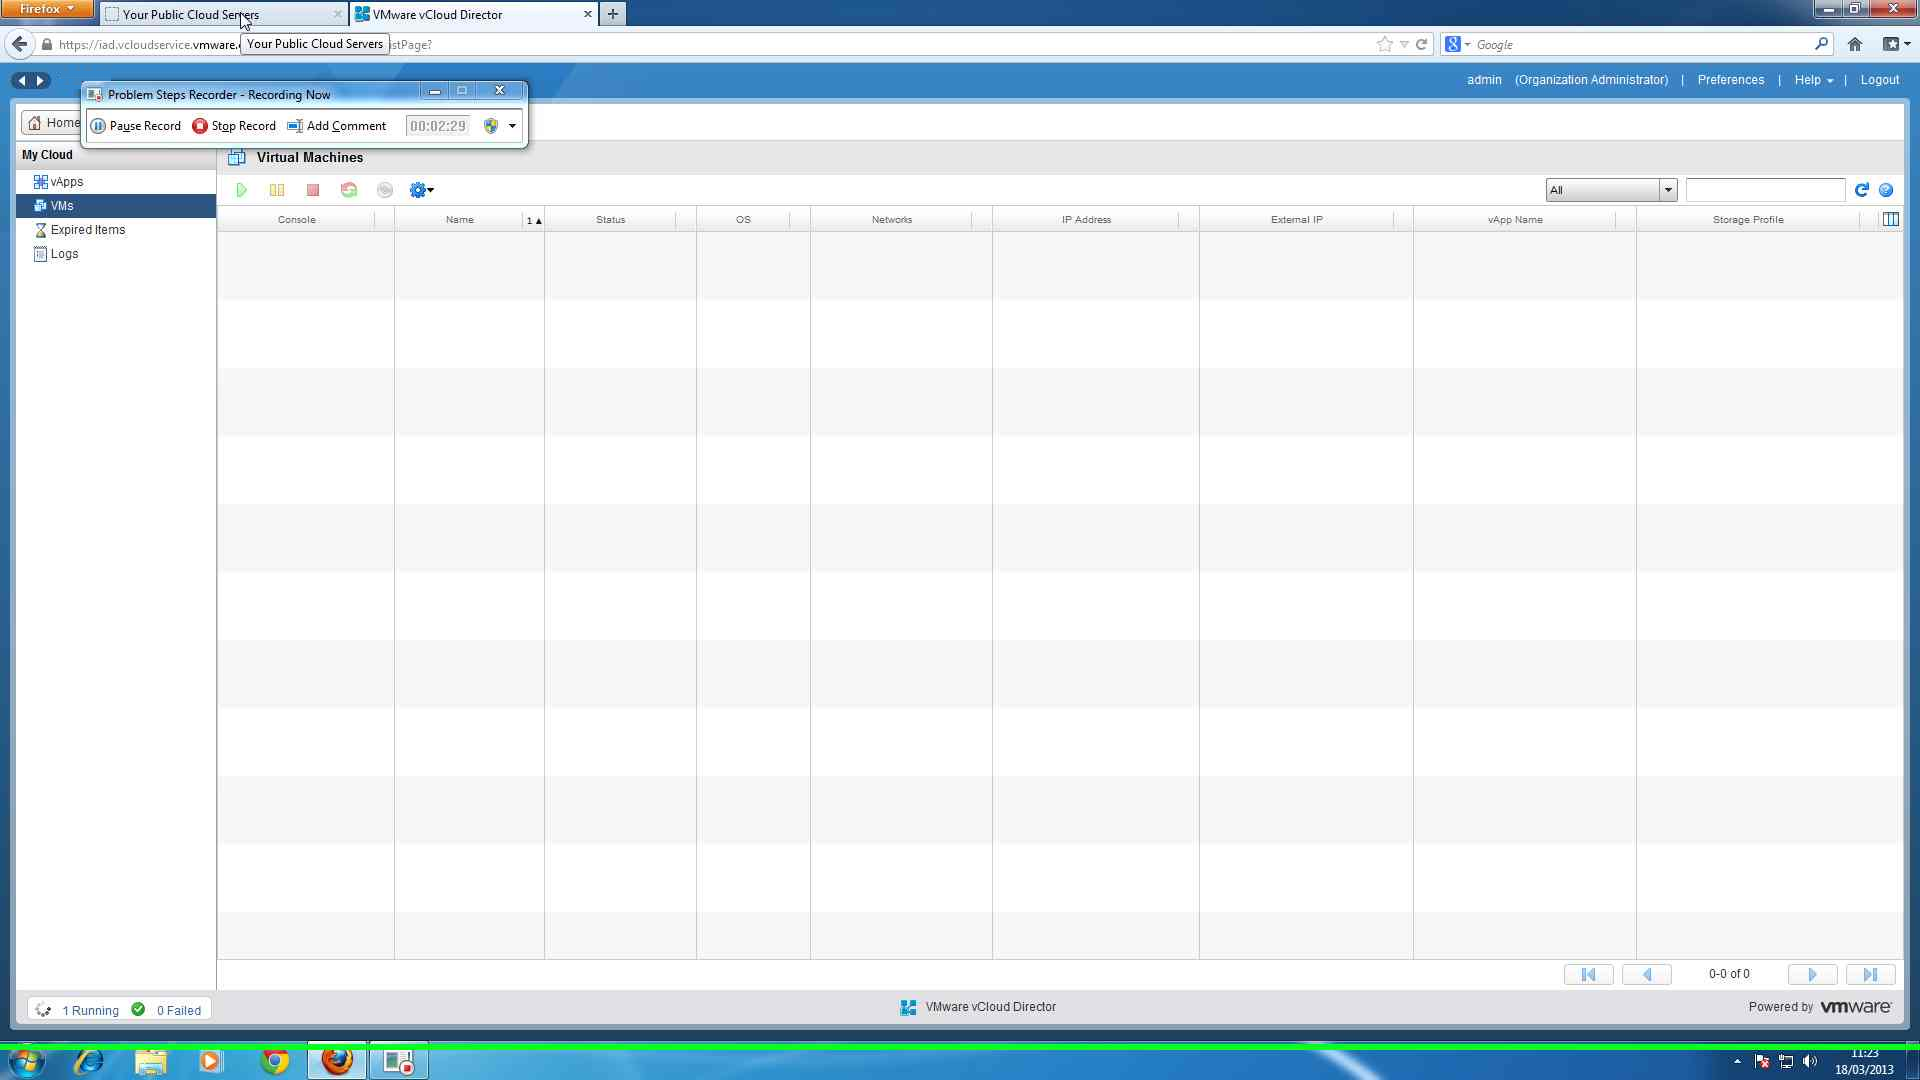
So, the deletion failed on my new machine as well, proving there was a bigger issue present. I decided to fire up vCloud Director as that’s where I go for more control. Once there and in the “VM” pane, this is what I saw:

It seemed very likely that the “Partially Powered Off” status was causing the problem. As the machine was up for deletion anyway, I forced a power off:

Followed by a deletion:

This time, the machine went without issues and it was all clean:
After that, I went to the regular vCloud screen. The error machine was still there but one needs to “Reload”, to clean up the interface.

Once done, the machine was gone. I reported back to my colleague who was then able to create the new machine he wanted. I thought this is worth documenting as a quick blog post because the error message being seen wasn’t accurate enough and other people might see the same thing.
Moral of the story: When in doubt, use the vCloud Director interface! 🙂
In the past couple of years, the term “cloud services” has become very fashionable. Every company wants to be on it. So, even if your day-to-day job is not virtualization, it still makes sense to know about it. Now, even though a cloud service is just a platform outside your own private environment, to someone who hasn’t worked with it, the concept seems alien. There is also a mental hurdle in going to a cloud service provider and entering your financial details, even to get free resources for a period.
Fortunately, VMware has just made its “VMware Hybrid Cloud” available for evaluation. Like every other VMware enthusiast, I felt compelled to try it out and see how it works. This service is great as it’s completely free for 90 days and there is no requirement for payment details. So, if you want to play with cloud services to see its potential, I would strongly suggest having an account set up today and start playing. Aim of this article is to document the steps required so that you can get up and running quickly. So here goes:
The first step is to go to the “Evaluate vCloud” page and click on the “Free Trial” button. It takes you to the “VMware Hybrid Cloud Evaluation” page, where you need to provide your Name, Company Name, Business Email and Phone number. You also need to read and accept the terms and conditions.

Once done, the next page presents you with contact details for phone activation. However, if the phone number you’ve provided is a mobile number, you also get an option to have a verification code sent to your mobile. Once chosen, you should receive a code within a few seconds, which if you enter on the page, you’ll have your request approved immediately. The result is a mail in your mailbox, with login, password and a link to the service. While you can try going to the site immediately, it tells you that you might need 15 minutes or so before you can log in. In my case, it was a few hours but that could be due to the enormous load that they must be experiencing immediately after the announcement. Eventually, you will be able to log in and see this page:

That’s where the fun begins. I would recommend using Firefox with this as I’ve found it to be more responsive but Internet Explorer is also a good choice. Chrome users will be a bit disappointed as the vCloud Director environment won’t work with it. Notice the “How do I create a Virtual Machine?” link. Click that for an excellent introduction to the process. The process lets you create machines using pre-built templates i.e. you don’t even need the media and the machines are ready in a few minutes. As long as you remain within the resource limits and have no more than two machines, it’s all free for 90 days! You can also install “Applications” e.g. a WordPress Server.
Let’s create a server then! The next tab in the interface is “My Cloud”. Clicking on it, displays the following options:
![]()
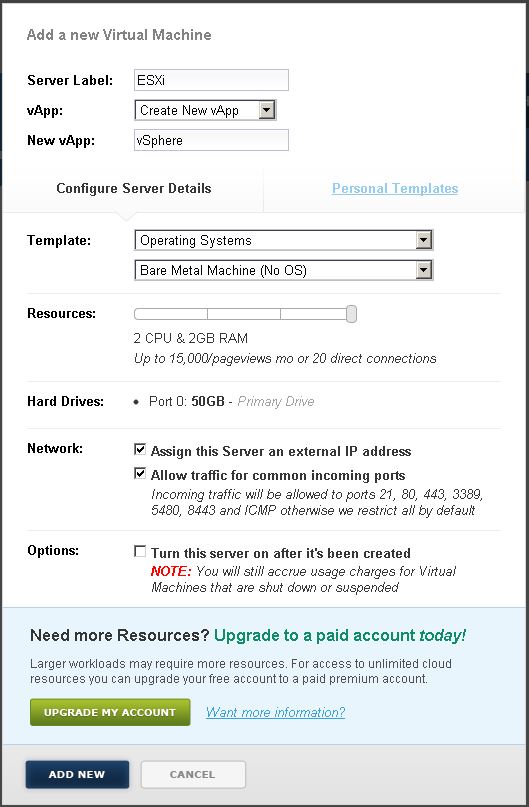
Clicking on “Add a new server” should bring up the interface that allows you to build a new server. As a test, let’s build a Windows Server 2008 R2 machine, with minimum resources. Choose the following options:

Click “Add New” and the process of building the server starts. It’s as simple as that! Wait for a few minutes and it’s done. At the end of it, the screen looks similar to this:

One thing the process forgets to mention is the password for the machine you’ve just built. Not to worry. To see that and other details, you need to click the small button on the right (highlighted). With that, the details are displayed, along with the password:

Of course, you can’t see the password here as I’ve erased it :-). It should be where I’ve indicated in the picture above. Also, you should have IP Addresses listed, assigned to you depending on your selections. You can use the same process to create any of the machines listed in the OS menu or even build application machines.
Now you can click on the screen shown and “Run Console”, which should display the console screen, after installing a plug-in and allowing a pop-up in your browser if required. You could also click on “View in vCloud Director” to open a new tab where a proper vCloud Director style window will open and present you will all the familiar options.

This is where Chrome users will feel disappointed as the option doesn’t work with it. That said, you don’t have to use vCloud Director and you can interact with the machine while remaining in the “View my Public Cloud” screen. The machine needs to be powered-on to connect ISO etc. and if the plug-in is installed, the console will also run fine.
Please note: If your browser has just been upgraded by Microsoft to Internet Explorer 10 recently, then the console will still throw up a warning but click on “Continue Anyway” and it works (correct at the time of writing 16/03/2013 12:15 GMT).
If you’ve followed the process so far, clicking on “View my Virtual Networks” reveals the following screen:

The red boxes mark the areas where you’ll have IP addresses assigned to your machine. As you can see, you can control what talks to the machine you’ve just created.
It’s all well and good to create machines that already have templates but what if you want something not available up there. Again, there is an option for that. Not very obvious but if you click on “Administration”, you can find:

Click on the link “Upload New Media”. I won’t repeat what is mentioned there as it’s a well-documented process and does exactly what it says on the tin! Essentially, an MSI package gets installed and once done, you can upload your own media and templates to use as you please. Remember: It’s your responsibility to ensure that all licensing requirements are in place for the media you upload and use.
Once uploaded, you can use that media with another option that is available while creating your machines: The “bare-metal” option. Here are the options I selected to create a custom machine:
At the end of the creation process, you might see this error:

This is nothing to worry about. The process tries to apply a customization process to the machine but with no OS present, it doesn’t make sense. VMware will probably fix this later. Click “OK” to continue but I would strongly suggest editing the machine’s configuration (in vCloud Director) to untick “Enable Guest customization” as having it enabled, might interfere with booting up of the machine later.

At this point, you may find that your newly created machine disappears from the list. If that happens, click “Reload” on the right-hand side on the menu bar above and the machine should return to the list.

Now the eagle-eyed reader will have noticed by now that I am trying to create an ESXi server in the cloud. Granted, this might not have much use up there but it would have been quite simple to create any Windows or Linux machine and I needed a challenge :-). Note that the machine gets created as a “CentOS 4/5/6 64-bit)” machine and as ESXi requires 2 CPUs and 2 GB RAM, that will allow just one machine for me.
Power-on the machine, attach the ESXi ISO and you will probably need to reboot the machine to boot from that ISO. Alternatively, you can fire up vCloud Director with either Firefox or IE and attach the ISO before booting up the machine. Either way, the machine successfully boots up and arrives at the ESX Installer welcome screen.

Rest of the process follows as normal. The only thing to report is the issue with Hardware Virtualization not being enabled but hey, this was just a test to prove a point. I tried ticking the box that is available in the “Hardware” tab (while editing the machine in vCloud Director) but it can’t be ticked on my set up as either the underlying architecture either doesn’t allow it or the free version doesn’t.

I hope this quick run-through will prove to be useful as a starter. Next step would be to link up a couple of servers to my internal set up to make it truly hybrid but that would be a post for later. I would highly recommend anyone to have a go at this free service. Idea: Maybe you can place an external mail server to cleanse and discard unwanted mail before it hits your network? Will save a lot of bandwidth! 🙂
I am glad that VMware has finally decided to enter this arena as a bit of competition between the big guns, can only be a good thing for consumers like us 🙂
Hope this helps!
In the first and second posts of this series, I covered my thought process for deciding what hardware and software to use for my new lab machine and then what I actually bought and built, respectively. In this last post of the series, I intend to cover some optimizations I did after the build, some benchmarks and a verdict on how I think the machine is performing. So here goes:
SSD Firmware Upgrade: First things first: Whenever using SSD in a system (especially when it’s also used to boot), I always check if there is a firmware upgrade for it and if one exists, I apply it. While installing the OS, I had already noticed that every now and then, the system wouldn’t recognise the boot disk and the system sat there waiting for it. A reboot always fixed that problem. My suspicion immediately went to the firmware. Upon checking, I found there was an update available, which I immediately downloaded and applied. Lo and behold, the problem disappeared completely! This is a good idea not just to fix boot issues but it usually also results in performance improvements. In case you’re using the same SSD (512GB Crucial m4 2.5-inch SATA 6Gb/s (SATA III)), you can find the upgrade here.
Optimise for Best Performance: By default, Windows 7 chooses what’s best in terms of performance and visual appearance. While animation, fading, thumbnails etc. look good aesthetically, they are pretty taxing on the processor. If the reason this machine exists is to run virtual machines, you probably are not that interested in visuals. For that reason, I switch those luxuries off and set the machine to “Adjust for best performance”.

Adjusting for best performance
Switch off Page File: If I have loaded my machine with lots of RAM and I intend to set VMware Workstation to “Fit all virtual machine memory into reserved host RAM”, then I can’t see why I can’t switch off the page file. It’s quite useful if there is a shortage of RAM but there is a severe penalty in terms of disk access. That said, even more important to me in this case is wastage of precious SSD storage. With 32GB of RAM (with a possibility of 64GB), I get a default page file of exactly that size. Why should I waste that space? Sure, switching that off might cost me a machine or two but I won’t be compromising on speed. Core dump is also one thing I’ll be missing out on but let’s hope I don’t get an unstable OS. If I do, I guess I won’t be running virtual machines at the time and I can always switch paging back on.

Page File Disabled
Switch off Hibernation: Now this is a tricky one. I prefer to do that, to save space on my SSD as the space consumed is equal to the amount of RAM installed. However, if you have a UPS connected directly to this machine, it might complain that automatic shut down of the machine can’t happen in that state. So, make your own decision on that. I do have a UPS connected and don’t get many power failures and if I do get one, it’s usually a minute or so. So, I’ve decided to take a chance and if the lab does go down some day, it’s just a lab! I’ll bring it back. At least, I’ll be saving precious SSD space in the meantime. In case you want to do that, here is a good link.
Indexing: Another thing you can quite safely switch off and improve performance, is indexing. Searching for files still works fine – it’s just slower! For the very rare event that I might want to search for something on this machine, I guess I’ll just accept the delay.

Indexing Option Switched Off
These are the main optimizations I’ve implemented. I guess one can keep going forever but soon it becomes a case of diminishing returns so for me, this was enough.
With this out-of-the-way, I did some quick benchmarking. Here are the results:

RAID 10 Drive Performance for the Xeon-based Server

SSD Drive Performance for new Core i7 machine
As you can see, the single SSD drive has much higher read/write performance as compared to the four (7200 RPM) drive RAID 10 array on the Xeon machine. Write seems to max out at 260 MB/sec but Read occasionally goes above 550 MB/sec. Obviously, these tests are just an indication as the real performance depends on how the virtual machines behave in normal operation but like for like performance comparison between the two storage types, validates my decision to go SSD for this build. As prices for SSD come down, I intend to build an SSD array, which should give me even more performance. Another issue the array should resolve is risk of disk failure. This is a one disk set up so I could suddenly lose all my machines. That said, I am not too concerned as it is meant to be just a lab and while it will be very inconvenient to lose the machines, I can still rebuild them.
Just in case, I did another quick test using HD Tune Pro:

SSD Drive Performance for the new Core i7 machine (Using HD Tune Pro)
… and the results are pretty much the same!
Happy with the disk performance, I transferred some of my machines from my Xeon server to this new machine, after converting them to thin (possibly subject of another post soon). The set I’ve transferred initially consists of:
- Windows 2008 R2 DC
- Windows 2008 R2 machine with SQL 2008 R2, running vCenter 5.0, Update Manager, Composer
- Two ESXi 5.0 servers, with a few nested virtual machines running
- View Connection server
- Windows 7 desktop
Bringing them up was a joy! Having all this performance meant that machines came up lightening fast and became stable very quickly. Generally, when machines are left running for several days, paging kicks in and they start to become sluggish. There is nothing of the sort in this case: Running the machines for a couple of weeks continuously has shown no sluggishness and they are as responsive as they were on day 1.
As I mentioned in the last post, partly due to cable management and also due to absence of hard disks with spindles, the system runs very cool and I haven’t yet seen a need for extra cooling. With all these machines running constantly for more than a couple of weeks, the processor runs between 22-24 degrees Centigrade and the machine remains between 32-34 degrees Centigrade. For that reason, fans are running at very low-speed and therefore, the machine is virtually silent.
Verdict: Needless to say, I am pretty happy with the machine so far. As you know, I went for cheap/unknown brand of RAM so I was a bit worried but it’s working absolutely fine so far so I’ll most probably go for another 32 GB. I’ll probably also go for a couple of additional 512GB SSDs in the future and make a 1 TB RAID 5 array – although, I suspect that will take a bit longer.
My results have been pretty good and exactly what I was expecting. I hope this series of posts help/encourage you to build a system with this or similar configuration too. Please do feel free to post comments/questions if you have any queries. I’ll be glad to help!
In my last post, I discussed the things that are important to me when I am considering to build a new machine for my lab and my reasons for choosing certain options when building a new one. I promised to report on what I bought and built after making the decisions above and how it went, so here it is!
Hardware:
Motherboard: Decision made in the last post was to go for a white box solution, rather than a branded one. So, the question was: Which motherboard to go for? As you know, there is no shortage of good motherboards with varying capabilities. To me, supporting the latest type of processors and capacity for a large amount of memory was important. So, I started looking at motherboards which supported “Sandy Bridge” line of processors and supported 64 GB of RAM. There were a few available that met the criteria but I went for an Asus P9X79 PRO Motherboard. There also is a “Deluxe” version of the motherboard available, which offers some extra connectivity and built-in WiFi but I didn’t need any of that. Even though I am not using it initially, I quite like the SSD Caching feature and would like to keep it in my back pocket, in case my plans change for this machine.
Processor: I wanted to get the best price/performance ratio and yet didn’t want to go for something that will be outdated as soon as I buy it. After comparing speed and the premium I would pay for it, I decided to go for an Intel Core i7 3820 Quad Core CPU. Reasonably priced and suitable for my set up!
Memory: As mentioned before, I needed a motherboard with 64 GB of RAM. This was to ensure that I am not restricted to a certain number of machines due to insufficient RAM capacity. Initially, I am going to put 32 GB in and see how things work. If required, I’ll put in the rest. In my Xeon-based machine, quality of RAM mattered quite a bit but this time, I wanted quantity and not necessarily quality. As long as it works and is reliable, I am happy. For that reason, I took the cheaper option and didn’t go for the “branded” option. I bought Komputerbay 32GB (4x 8GB) DDR3 PC3-12800 1600MHz DIMM with Blue Low Profile Heatspreaders. They go nicely with the motherboard (in terms of colour as well :-)) and haven’t let me down yet.
CPU Cooler: I mentioned in my last post that I try to build my machines to be as quiet as possible. To make this one quiet as well, I went for my tried and tested brand: Noctua. Their coolers are big but very quiet and are perfect if you don’t want to go down the liquid cooling route. This is what I bought: Noctua D14-2011 Dual Radiator PWM CPU Cooler. Now if you’re going for this cooler, make sure it’s for your socket type as there are other versions of the same cooler. Also, you would want to make sure that you’ll have enough clearance in your chassis and above the RAM slots after installation so that you don’t run into problems. Once I was happy that everything will fit OK, I went for it.
Case: Initially, I was going to use the same case that I had for my retiring computer. However, once I decided to go with the Noctua cooler, I had to go for a new one. I started looking for something that can fit lots of fans (if required) and possibly a water cooling kit as well. I was also thinking about proper built-in cable-management and a “tool less” chassis. Lots of expansion capacity was also a consideration. Bearing all this in mind, I chose Corsair Carbide Series 400R Mid-Tower Gaming Case. It has all the features I was looking for (just look at the number of fans it can accommodate!) but also has USB 3.0 connectors on the front panel and built-in compatibility with SSD devices – something I was going to use right from the start. It also has enough depth to easily accommodate the Noctua cooler and still have space to spare!
Power Supply: Fortunately, I was able to re-use the power supply from the old system. I don’t have the link to it but it’s an Enermax 600W power supply. I always buy power supplies of rating way over what I actually require. That ensures stability even at high load and even if I add things to my machines later, the supply is able to cope easily. One thing you don’t want in your system is a dodgy power supply! Over-spec’d power supply also means I can re-use it years later, which I am doing in this case :-). One issue that I do have: It does not have modular cables as such power supplies were rare in the days I bought this. Generally, it’s not a problem but cable-management in my new system means routing them through holes in specific places, requiring longer cables. Everything else was fine but the 12V DC connector falls a bit short if I route it properly. For that reason, I’ve taken a short cut for now. I plan to buy an extension soon.
Storage: As mentioned in my first post, my plan is to use an SSD with thin-provisioned VMs to have more IOPS available on the system. The SSD I bought for this purpose is: 512GB Crucial m4 2.5-inch SATA 6Gb/s (SATA III). Again reasonably priced but should also fit enough thin-provisioned VMs to fill up the RAM. For VMs that may require a lot of disk space, I plan to run them on my other machine, which has a RAID 10 set. Time (or maybe my next post :-)) will tell if this decision worked as well as I hope it will.
Graphics Card: Again don’t have a link for it as it’s also from my retiring system but this motherboard doesn’t have built-in video so you require a card for it. In this case, it has to be a PCI Express card. As we’re not really after graphics capability here, my old card will do nicely but if you are the gamer sort (or want to take advantage of better graphics support in VMware Workstation 9) then there is no reason why you can’t use a higher-end card.
Software:
OS: This one is easy. With VMs, you want a stable OS and everything fully supported on the host environment. A smaller footprint also helps. For that reason, I’ve gone for Windows 7 and even though, I tested Windows 8 briefly as I had the chance, there is no chance I am going to run that on my new machine for now. The bundled drivers don’t support Windows 8 as it’s too soon so I guess it was a given anyway.
Hypervisor: As mentioned in the last post, I chose VMware Workstation as the platform to run my VMs. What I didn’t mention was that I am going for version 9.0 on the new machine. It has native support for Windows 2012 and Hyper-V and I like simplicity. 🙂 I’ll keep version 8 on my other machine so that I have both versions running on different machines – in case, I run into version issues.
With all this hardware/software gathered, I went to my kitchen table, created a lot of space and put it all together. There was nothing unusual about the install to write about, apart from the one issue where the 12V DC cable fell a bit short via cable-management. After installation, the system looks like this:

Lab Machine After Installation
Due to chassis design, absence of bulky hard disks and cable-management, there is good airflow naturally and the system runs so cool that the BIOS started throwing up errors saying the fans are running too slowly! Maybe I need to put some load on the system :-). After that, Windows 7 was installed, updated and all drivers were installed from the support CD. All devices were detected without issues so all drivers provided, work OK. The system is now in my study, connected to my dual-headed KVM and working nicely.
That’s it for this post. I do intend to have another post in the series, to report on how the system fared in comparison to the old system and if the choices made in building this system were valid or not. This post took too long to get out, due to work commitments but I will try to get the next one out as soon as possible.
As always, please feel free to ask if there are any questions on this or post a comment to share your experiences. It’s always good to know what other people are doing!
Update: Part III of the post is here: Building (or Upgrading) a Virtual Home Lab Machine – Part III
While working with server builds and configurations, one is frequently faced with a scenario where the system (as a client), needs to connect to a server at the other end and the process doesn’t work. If one’s lucky then an intelligent message is returned by the interface, hinting about the problem but more often than not, the message says something on the lines of: “I failed for some unknown reason. Please work out for yourself what went wrong.”
I’ve found that in a lot of cases, it’s due to some firewall blocking a particular kind of conversation. Companies are quite security conscious these days (a good thing!) so there usually are multiple layers of protection in place, making such communication impossible unless it is specifically allowed at all layers. So, is there an easy method of finding out if some firewall is in the way of you successfully making your connection? Fortunately, I’ve been using a simple “out-of-the-box” technique for quite a few years now which has saved me loads of times over that period. As I quite frequently find people who are still unaware of this easy technique, I thought I should share it here so that people can benefit from it.
Now, before I start, I am assuming that people will use this on Windows and *nix systems and we’re talking some TCP protocol here. With that assumption in place, if I need to work out if a firewall is blocking my communication, I open a command-prompt (assuming a Windows system first) and type:
netstat -ano | findstr -i SYN_SENT
Initially, it shouldn’t return anything. The next step is to run the process that was being attempted previously and simultaneously, run the command again. If a firewall is blocking communication, an output will be returned, showing SYN_SENT status for the client:port/server:port pair (also with the ProcessID to help verify we’re looking at the right process). Once this happens, you can see which protocol(s) is/are being blocked and then it could be passed on to the network administrator to decide upon and open if appropriate. The equivalent command I use on *nix systems is:
netstat -ano | grep -i SYN_SENT
Explanation: This technique relies on the fact that every TCP connection starts with a three-way handshake. The client sends a SYN packet and waits for an ACK packet from the server. While it waits, the connection status is set to SYN_SENT. If there is a firewall blocking the connection, the server won’t ever receive the SYN and therefore, will never reply. This means, for the duration of the process i.e. until timeout, the client’s connection will remain in SYN_SENT status. This is basically what we’re looking for when using the commands mentioned above. As you can see, you have to be quick to run the command while the process is being run as SYN_SENT status disappears very quickly, once the connection attempt times out.
Bonus Tip: As all we’re doing above is running a command, piping the output into a string filter and searching for a particular string, the same technique can be used in various other scenarios where a lot of output is returned and you need to filter the output, to look for a particular string e.g. a target server or status. For example, running:
dcdiag /v | findstr -i “test”
is much more efficient in displaying success and failure results than without the filter.
Hope this helps!
When sharing a printer on a Windows 2008 R2 machine (or on Windows 7 for that matter), the operation might fail with the following error message:
Printer settings could not be saved. Operation could not be completed (error 0x000006d9)
This could happen if the Windows Firewall service on the computer is stopped or disabled. Enabling the service fixes the problem!
This might seem strange at first but if file or print sharing has never been used on that computer before, the spooler service tries to contact the Windows Firewall service to configure incoming rules for File and Print Sharing. If the service is not running, the process fails with the error mentioned above.
The error message goes away once the service is started and sharing can be configured as required. Once sharing is enabled, Windows Firewall service can be returned back to its original state. As the required ports are now open, sharing will keep working fine after that.
Hope this helps!

